
No oven space, never hosted Thanksgiving, and short on time? This No Baste Turkey Recipe Easy Emergency Turkey will get you through!

Are you strapped for time on Thanksgiving? Are you hosting for the first time ever? Do you have no oven space? Bottom line…are you stressed about the turkey? Well don’t be. In my humble opinion, the turkey looks like it’s the star of the Thanksgiving show, but if you took a poll, I bet people are more excited about the sides and desserts! Don’t get me wrong…I like a good turkey and am on team dark meat for any poultry. I don’t like dried out white meat with no flavor. If it’s not a fried turkey, or a smoked spatchcocked turkey, this deconstructed no brine, no baste turkey recipe is what I will be doing!
Remember…the whole reason for the holiday is to be surrounded by the family and friends you love the most and be thankful for what you have been blessed with…family and friends definitely topping that list! Cook for them, serve them, enjoy them, and thank God for them…not only on the big day or Sunday, but every day!
See full recipe card at the bottom of the page with detailed ingredients list and full instructions to make this No Baste Turkey Recipe. Print to save in your cookbook binder or bookmark this page!
Why I love this No Baste Turkey Recipe
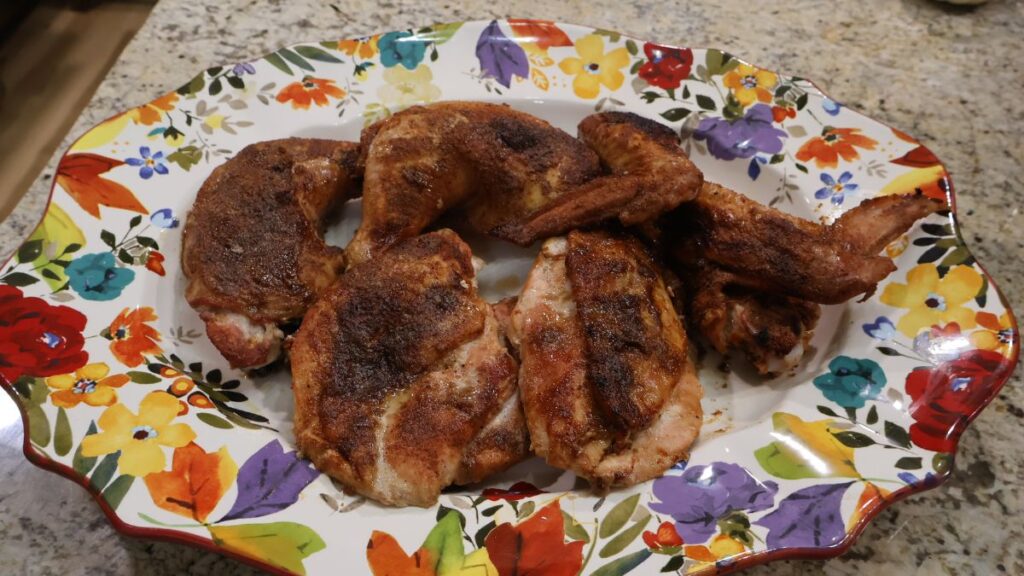
This method of cooking your turkey might not be the “best way” or yield picture-perfect thanksgiving turkey, but it still looks darn tasty on your platter and gives you all of these benefits that the conventional prep and cook just can’t give you! I will pick taste and some efficiency over presentation of a dry “pretty” whole bird any day and that’s where this no baste turkey recipe shines.
- This turkey is separated out, so you can pull your breasts out before your dark meat
- I cooked this 14 pound turkey from start to finish in less than an hour and a half
- This recipe is cooked using a large sheet pan on one rack in your oven
- Bottom rack of the oven is an ok spot to use, no headspace needed
- You will have room in your oven for other sides, rolls or desserts
- You can make turkey broth from your turkey back, neck and carcass before you even cook the turkey to use in your dressing and gravy
- There is flexibility with oven temp and cooking time to work with your other dishes
- I’m not a fan of sage type seasoning on any of my meat; you can liberally season how you want
- No large roasting pan needed; use your sheet pan(s)
- You can do a turkey brine if you want, or inject if you want, but not necessary
- The breast meat was still juicy without any brine, or injection
- The cooking process is as easy as cooking sheet pan chicken on a week-night
What You Need to Process and Cook your No Baste Turkey Recipe
Ingredients
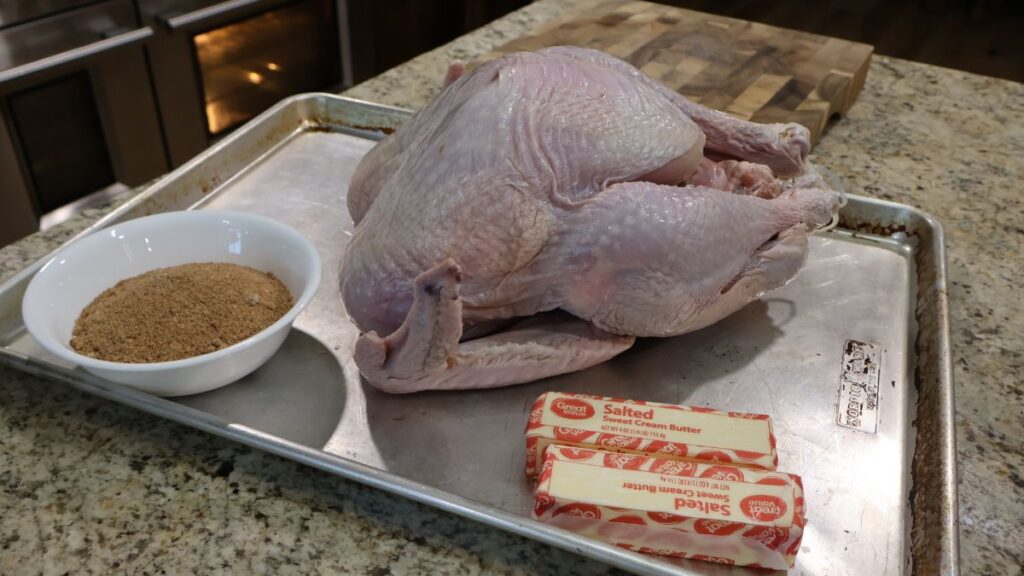
- Thawed Whole Turkey
- Seasonings of Choice
- Butter
Thawing Your Turkey
The turkey I used a 14 lb turkey. Rule of thumb for thawing your turkey in the fridge is 24 hours of fridge time for every 4-5 pounds of turkey. See USDA recommendations for turkey thawing here.
WARNING! Remember to account for your fridge temperature! I accounted for 4 days to thaw my bird, but I forgot to take into consideration that our shop fridge temp is set super low. The inside giblets were still slightly frozen when I took the turkey from the fridge. The meat on the bird was pretty much thawed, but it was still a little stiff. I decided to give it some more time by putting it in a 2 gallon plastic bag and returning to the fridge. This was not Thanksgiving for us, so into the fridge for another 24 hours was no big deal.
I would add on 2 days to your expected thawing time if you have a super cold fridge, or at least one at normal fridge temp if you want to be ultra prepared. Per the USDA standards, this is safe. Check your turkey early Thanksgiving or cooking morning. If it is still slightly frozen, put it in cold water and check and change water every 30 minutes per USDA instructions.
Seasoning
Y’all…I don’t really like sage. I’m fine with it in the dressing, but I just don’t want that flavor in my meat. You can use whatever seasoning blend you want. I think a Cajun blend will be on our next one. But for this turkey, I just used my everyday “poultry” seasoning blend. I use that term lightly because it works on ribs and other pork just fine also. Find that blend recipe here. I made a huge batch and ended up using little under a cups worth.
Butter equals crispy skin, moist turkey, and better flavor!
Equipment Needed
You will need a sharp knife to process your turkey for this no baste turkey recipe. When I say process…yes…that means we are cutting this bad boy apart to separate the white and dark meat. Preferably you will also need a large cutting board to do your processing, but I just did mine on the sheet pan and sharpened my knife in between.
1-2 large sheet pans. Whether you need one or two will depend on if you prep your broth early from the turkey scraps and the size of your turkey and pans. I used my Nordic Ware big baking sheet and half baking sheet for this turkey and roasting the scraps for broth. 2 half sheets would have been fine though.
A meat thermometer is a must. If you don’t have one, invest in one. If you have been cooking one day, or 30 years, this one little gadget makes your life in the kitchen so much easier.
I will be sharing a list of all of my favorite things in the kitchen that I can’t live without soon, and my favorite knives, sheet pans, and digital thermometer definitely make the cut!
Breaking Down Your Turkey
This is the hardest part of the whole turkey roasting process, but you can do it. This video is a step by step of how we will break our turkey down to cook the individual pieces of meat. It’s quick to watch, easy to follow, and essential for this turkey cooking method!
I am a one man show and could not easily photograph this process. One thing I did differently for this turkey recipe is that I did not completely separate the breast and tenderloin. I kept them together as they came off of the bone in effort to get a more traditional thicker slice of breast meat. You’ll see that one set of the breast and tenderloin were pretty separated. I still just seasoned it and placed them on it on the pan together.
Your first time breaking down a turkey or a whole chicken will probably not be as effortless as ol’ Jacob makes it look, but completely doable and I did mine in less than 10 minutes. Definitely not my first time, but still something I don’t do monthly. A hack job is still a done job!
IMPORTANT!!! The key when processing your turkey is to keep your turkey dry as well as your knife handle. Use paper towels to grip the bird, if needed, and don’t let your knife handle get wet. Wipe it off, dry your hands, use a microfiber cloth for gripping, whatever you need to do. We want a cut apart bird, not a sliced finger! Keeping everything dry will insure there are no slip ups.
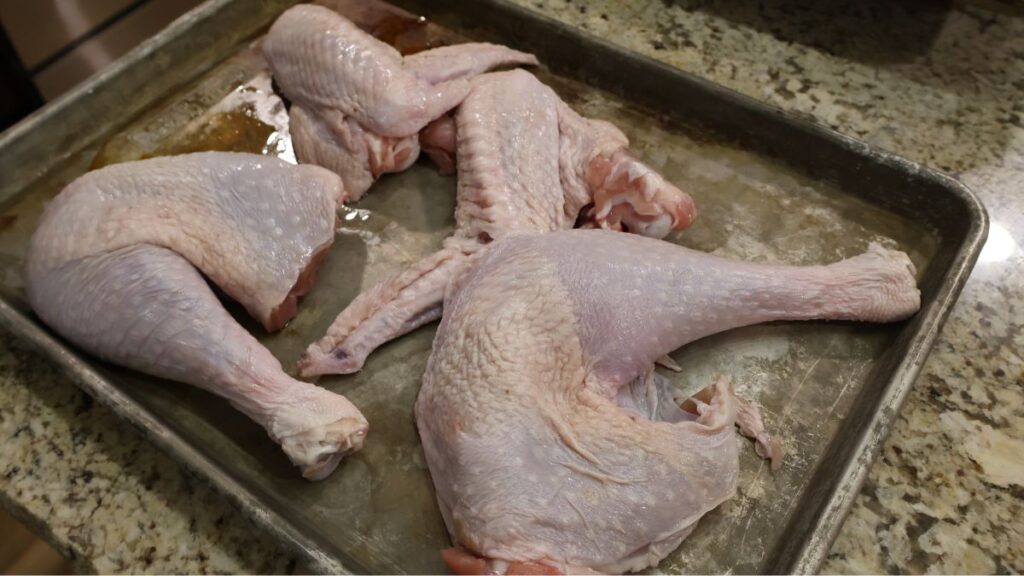
Optional Turkey Stock/Broth

Once your turkey is processed, you will keep your neck, back, carcass, and whatever other scraps you came up with for your turkey stock. You will be able to use this turkey stock for your dressing in place of a chicken broth, and to make a gravy for your turkey. It’s so simple. Make your broth early in the morning to use in other recipes for the day and you can return your other turkey pieces to the fridge so you can cook right before dinner.
Take all of your turkey scraps, neck, back, etc. and put them on a sheet pan. I also split an onion in half and put flat side down on the sheet pan. Salt it, then roast them in the oven for about 45 minutes. Once roasted put the turkey pieces, onions and any turkey pan drippings in a large stock pot and fill with water. Add in your stock seasonings. I salted mine, put in garlic salt, then a few cloves and a bay leaf for some seasonal like flavor, but nothing very strong. I put the lid on my stock pot and let it come to a boil and left covered on high heat for about 40 minutes. Then reduce the temp, to low to simmer for another 45 minutes or so.
Strain the turkey pieces from your stock, but DO NOT TRASH them if you plan to fix some turkey gravy! But your turkey stock is done…check!
If you do plan to make turkey gravy, pick the carcass, back and neck bone of the little bits of turkey meat that remain. It will add flavor and heartiness to your gravy.
Note…I didn’t use the bag of giblets from the turkey cavity in my turkey stock or gravy. Don’t come at me!
Instructions for No Baste Turkey Recipe
Further Prepping the Turkey
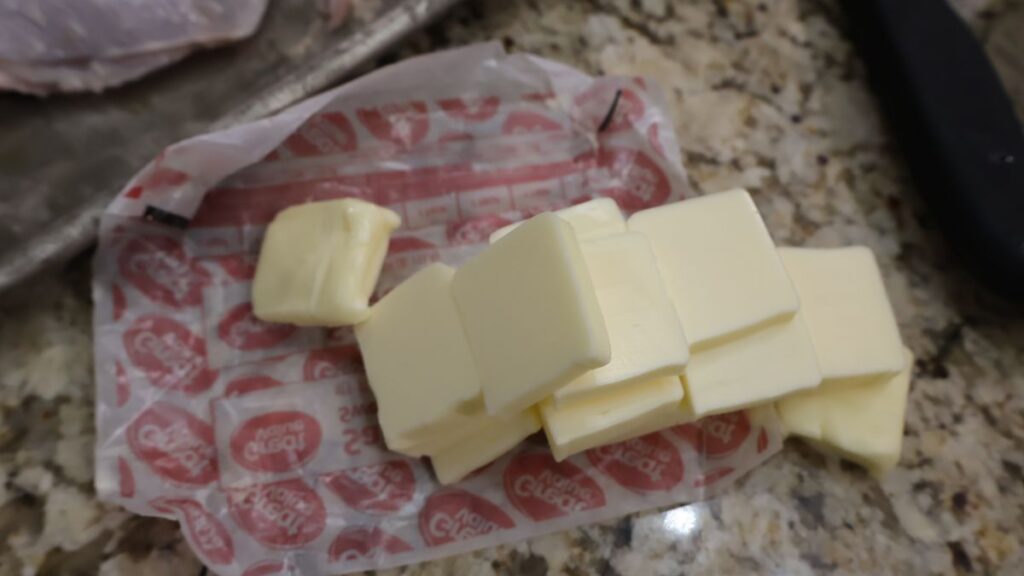
Slice your cold butter into small slices to have ready and preheat your oven to 400 degrees.
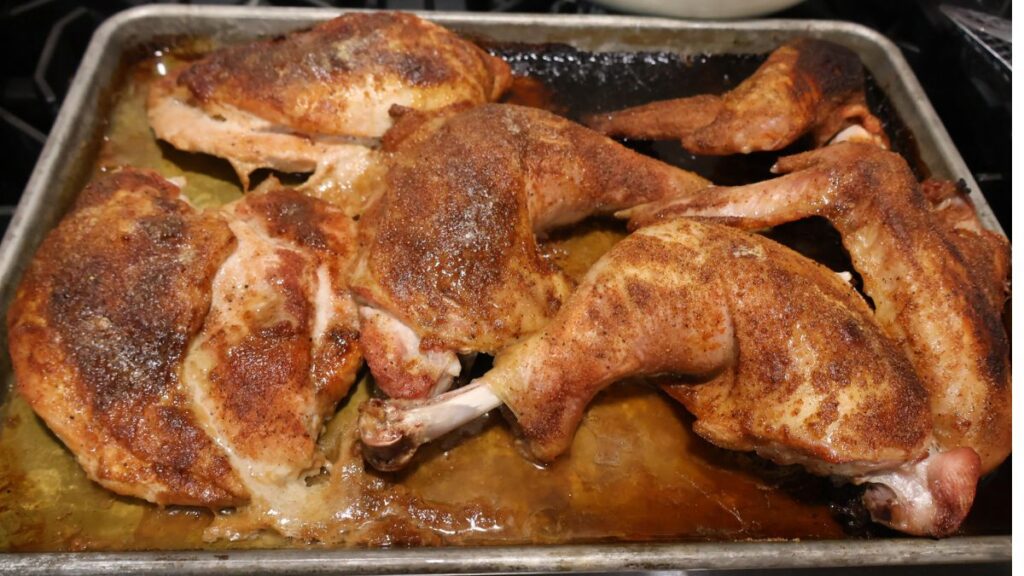
Take your turkey meat from the fridge if you made your turkey broth early, then put them on your sheet pan. No need to spray your pan. Butter will cover the pan shortly. If you have a really big turkey and your sheet pan won’t hold all of it comfortably, put your breast and wings on one pan and your leg quarters on another pan. This way you can take the turkey breast and wings out early by just grabbing the one pan. My turkey was smaller, so I was able to fit it all on one half sheet pan.
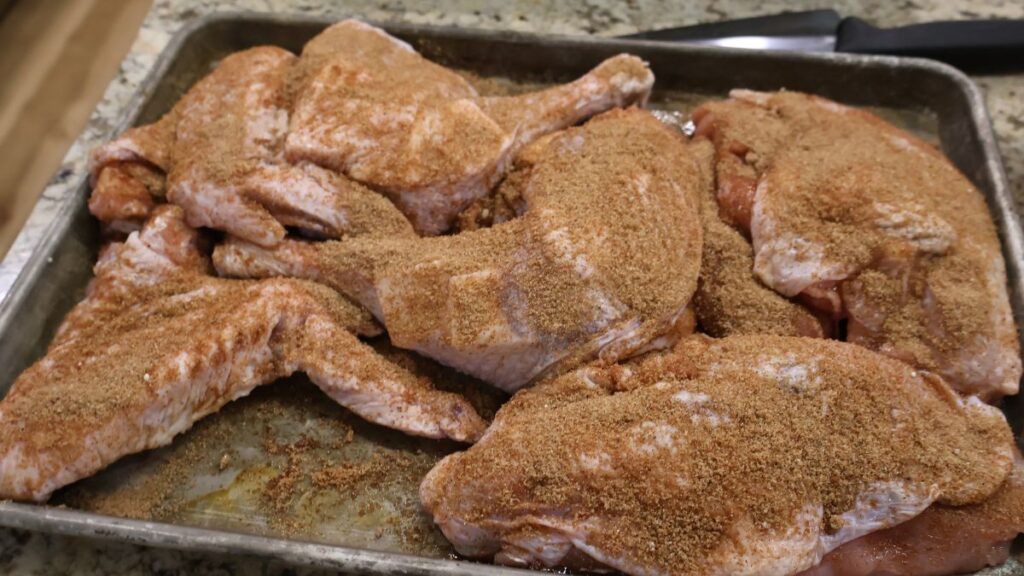
Generously season the back side of all of your turkey pieces with your dry rub type seasoning of choice. Again, I used my mixed-up seasoning that I use in countless recipes here at Farmhouse 181. Flip them over so the skin side is up and arrange on the pan where no meat is overlapping.
If you want to inject your turkey, do that now. I was whipping this thing out on a week-night and did not inject anything. Melt butter and mixed it with some of your seasoning blend if you prefer to inject. Do 3-4 small injections with your syringe on the breasts and the leg quarters.
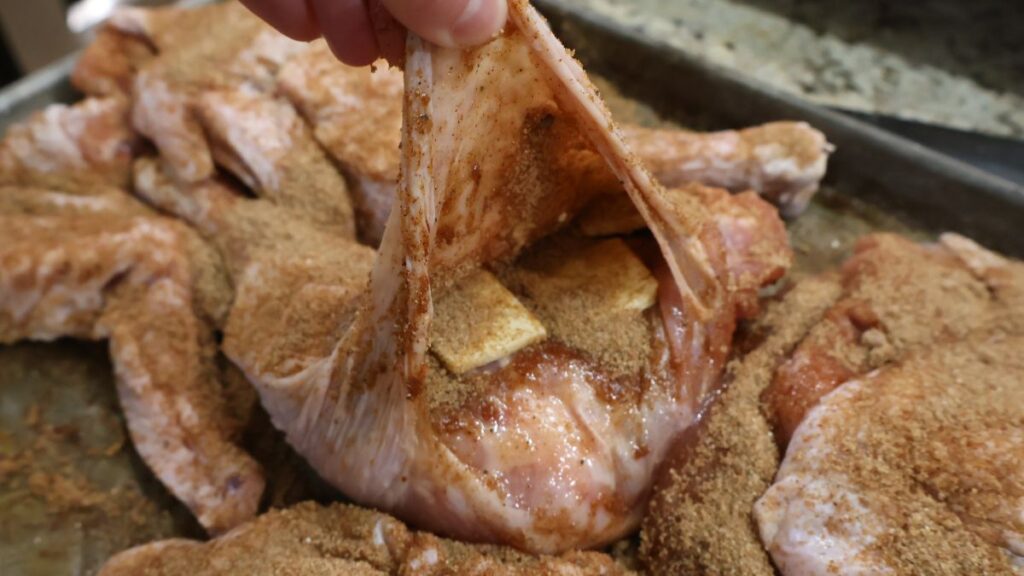
Gently separate the skin on your legs and thighs to make a pocket for your seasoning. Put a generous amount of seasoning in between the turkey meat and the skin for all pieces. Put 3-4 small slices of butter in between your meat and skin as well.
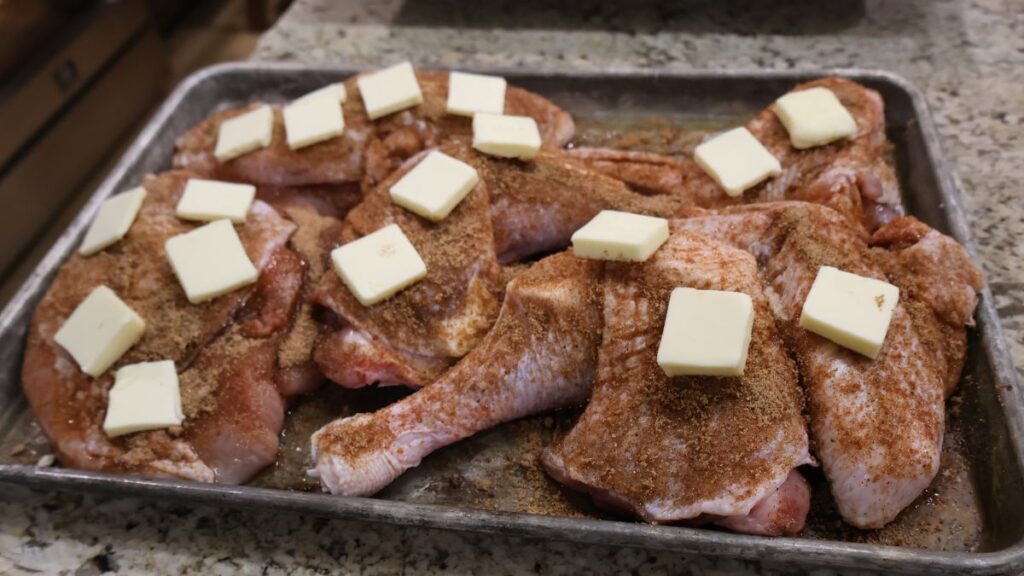
Generously season the top skin portion of your breast, leg quarters and wings. Put additional slices of butter on top of the turkey pieces. This will give you a tasty, crispy skin!
If you want pretty turkey legs, wrap the ends of the leg in some tin foil so the skin does not pull its way from the end of the bone. I’m sure you could guess…I don’t really care about this.
Cooking the Turkey
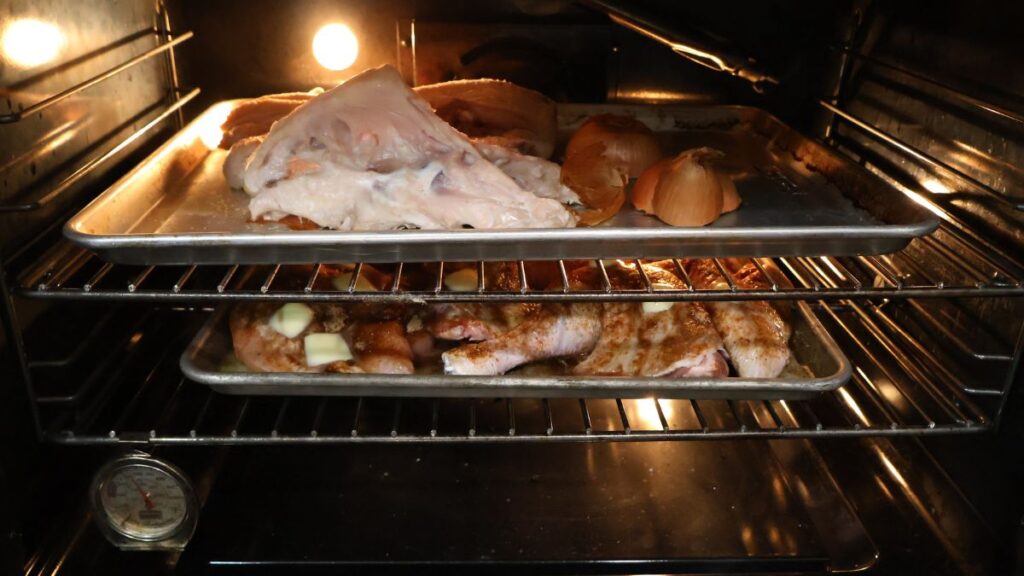
Put your turkey in your preheated oven of 400 degrees and bake for 30 minutes. After 30-35 minutes, you will want to check the internal temperature of that breast meat. Your breasts will be close to done. I cooked mine for about 40 minutes and I could have pulled them out probably 5-10 minutes prior. I easily get distracted y’all. Your wings will be done around the same time as your turkey breasts.
You want your breast meat to be at 165 degrees for a safe eating temp. Many people say only cook it to 145 degrees or so, but accidentally food poisoning my whole family is not on my list for a great Thanksgiving dinner! So do everyone a favor and make sure the thickest part of the breast is at 165 degrees.
Once your turkey breasts are cooked to temperature, pull them and the wings from the oven (check your wing temp also, just in case) to rest in the microwave and keep warm and let rest. You could also cover with aluminum foil.
Return your leg quarters to the oven, if you put all your pieces on the same pan, or leave your quarters to cook for an additional 10-15 minutes. Check them with your temperature probe at the thickest part of the thigh. You want your dark meat turkey cooks longer to an internal temperature of 185 plus. The dark meat doesn’t really dry out and cooking longer makes it come off the bone easier.
Scrape the bottom of the roasting pan to pull up plenty of flavorful bits. Reserve your buttery pan juices from your pan to make a delicious turkey gravy along with the turkey bits you pulled from your turkey back bone when you were making your turkey stock. Learn how to make that here.
Let your leg quarters rest for at least 10 minutes. Make your turkey gravy now so everything will be served hot!
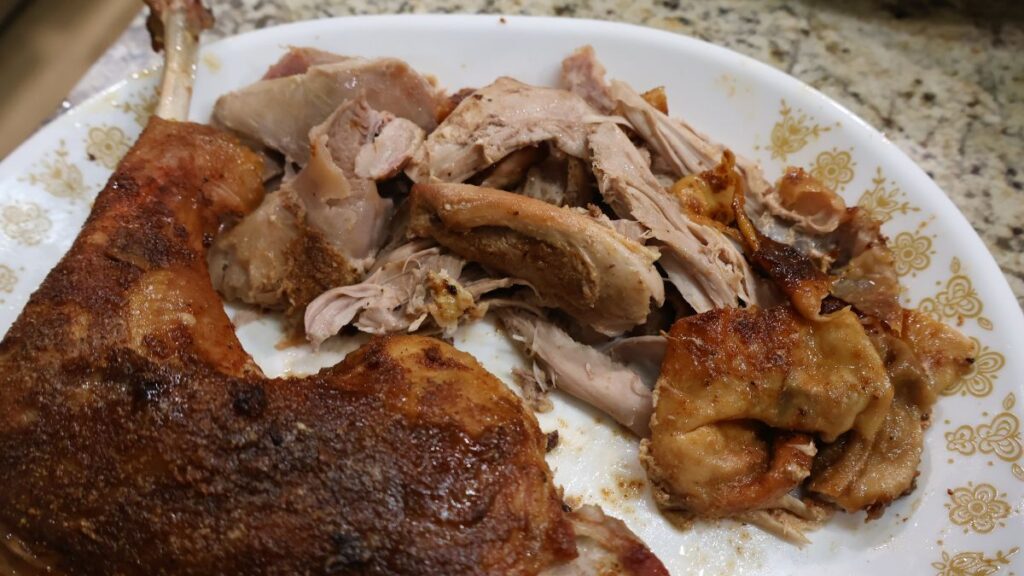
Pull your dark meat from the bone for easy plate fixing. If cooking just for your immediate family like I did on this night, I just slapped a whole leg quarter on my plate!
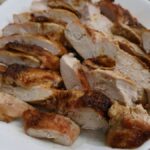
Slice your breast and serve! I like to slice mine in thicker slices to retain as much moisture as possible. Personal preference, but I also want it covered in gravy…yum!
Tips and Dry Turkey Fix
Note 1: you can decrease your oven temp and increase cooking time, if necessary, to cook other things at the same time.
Note 2…IMPORTANT: your cooking time will vary depending on the size of your turkey. Look for those internal temperatures to be your guide!
Did you get distracted? Did your turkey cook faster than expected? Do you wish you would have injected? It happens. If your turkey turned out dryer than you would like, pour a little bit of hot turkey broth over it and let it soak up some of that juice.
If you still find yourself with a turkey fail, do yourself a favor, build some memories and laugh about it…everyone else probably will too.
Recipes Mentioned
Want to make the turkey gravy to go along with your no baste turkey recipe, or the seasoning blend we use here at Farmhouse 181? Check them out here along with some of our favorite Thanksgiving sides:
- Learn How to Make Simple Turkey Broth and Gravy
- Farmhouse 181 Substitute for Poultry Seasoning No Sage!
- Creamed Corn Recipe (coming soon)
- Green Bean Casserole (coming soon)

No Baste Turkey Recipe, Easy Emergency Thanksgiving Turkey!
Ingredients
- 1 cup Seasoning Blend (Farmhouse 181 Poultry/Meat Seasoning)
- 1 Whole Frozen Turkey (cook times for 14lb turkey)
- 2 sticks Salted Butter, sliced
Instructions
- Preheat oven to 400 degrees.
- Slice your cold butter to have ready.
- Unpackage your thawed turkey and remove neck and giblets from the cavity. Pat dry on sheet pan or cutting board.
- Process or breakdown your turkey separating the wings, leg quarters, and breasts from the carcass and cutting out the back. Follow the video linked at bottom of the recipe for easy step by step instructions on this process.
- Save the turkey back, carcass, neck and other scraps for making a turkey broth, if desired. You will need to roast these pieces on a sheet pan for 45 minutes. Then boil them in water and your desired seasonings to make broth.
- Arrange your turkey pieces on a baking sheet pan (no flat cookie sheet! rimmed pan where juices can be collected)
- Season the underside of each turkey piece liberally.
- Flip the pieces over, skin side up, and make a pocket between the skin and meat. Liberally season inside the pocket.
- Put 3-4 slices of butter in the pocket between skin and meat.
- Inject the meat at this time with additional melted butter and seasoning, if desired.
- Season the top of the turkey pieces (skin side).
- Put 3 or so slices of butter on top of the chicken (on top over the skin).
- Bake for 30-40 minutes in oven. Check at 30 minutes. Remove breast pieces to check internal temperature. Bake the breast to 165 degrees.
- Check the temperature of the wings. Make sure at least 165 degrees also. They should be well done by the time breast reaches 165 degrees.
- Remove the wings and breast from the oven and move to the microwave, or cover with foil to rest and keep warm.
- Continue to bake your leg quarters until they are 185 degrees internal temperature or more.
- Remove from oven and let rest.
- Reserve the drippings from your pan to make gravy, if desired from the drippings, flour, and turkey broth.
- Remove leg meat from the bone to serve.
- Slice your turkey breast to serve.
- Enjoy
Leave a Reply